Ikas
Blender 3D ( 2 - The first animation )
 Introduction
- Armature and Mesh - A
little more -
Constraints -
Weight -
Weight paint -Various
Tricks
Introduction
- Armature and Mesh - A
little more -
Constraints -
Weight -
Weight paint -Various
Tricks
The
first animation:
Select
the cylinder and in the Edit Buttons window (F9) click ' SubSurf ',
set the subdivisions at 2 and press Z to switch to gouraud shaded
display mode. Then select the armature, click on the ' pose ' mode
button and view the results obtained by selecting one or more
branches (right click) and performing rotations (R) or adjustments to
the scale (S) operations on the branch(es). If you do not wish to use
the new ikas to perform animations, you may be satisfied to use them
instead as a modelling tool to deform objects.
Note:
In these examples the armature is seperated from the cylinder for
improved comprehension, but for real work it would be better to place
it inside of the tube.
An
amusing trick: Select the tube and move it, you could use a fixed
chain of ikas to create an animation path...

Don't
forget: To return to a result similiar to that shown above, switch
again to 'Edit' mode to display this ( Unless you did not perform any
of the preliminary modifications ). That's alright. In 'Edit' mode,
pressing U ( Reload original data ) will cancel any modifications
made, as long as you did not quit this mode.

A
final detail before we begin the animation, ALT+R, ALT+S can cancel
all the transformations made in 'pose' mode, if you are not satisfied
with the results. Return to 'Pose' mode ( Armature blue ) and give it
a position similar to that of the first image. Adjust the frame
number to Frame 1, select all of the branches ( A ), press I ( I as
in indigo, not L ) and choose the option 'LocRotSize' and observe the
transformations in the Ipo and the Actions editor windows.

The
Ipo Window: You will notice that the IPO's window contains a
new button ( automatically added with the insertion of the first key
) and that certain curves ( a little flat at the moment ) carry new
designations ( QuatW, X, Y, Z ) specific to the 'bones' ( A 'bone' is
an English term and it is also used to refer to a branch of the
armature, B1, B2 and B3, which are the three distinct 'bones' ).
Verify that no element is active and while clicking on the small
white dash '-' button, you should see a list: Action.B1, Action.B2,
Action.B3 which is the group of curves associated with each element.
If you select one or more elements, the curve associated for the last
element selected ( of the armature ) will be displayed. Pressing the
small button that resembles a thumb tack cancels this effect ( The
curve for a certain element which was displayed at the time the
"tack" button was pressed will remain, irregardless of
which element(s) are selected in the 3D window ). When the lock icon
button is active, ( it is inactive by default ), it makes it possible
to see the movement of the object in real time when you modify the
curves directly in the window (the remaining commands available are
absolutely identical to those for standard Ipo's ).
Note:
Often you will not be able to see all of the curves, since the
majority of them are superimposed, ie. they are overlaid, one on top
of the other.
Without
touching anything in the Ipo window, set the frame slider to 'Frame'
50, ( In 'pose' mode = blue ) select all of the 'bones' or elements
of the armature and press ALT+S, then ALT+R. The cylinder should
become "flat" (straighten out). Once again, press I ( it is
an I, not an L ) and select 'LocRotSize' from the pop-up menu and
then a second point should appear on the curves. Return to Frame 1
and press ALT+SHIFT+A to view the animation.
The
Actions Editor: Nothing could be simpler to use. Each
rectangle represents a pose assigned to each element of the armature.
Start by changing the scale of the window so that the lower scale bar
displays the values from 0 to 100 ( CTRL + middle mouse Button +
Drag, Note: + and - do not currently work here ). Then select the
first three rectangles ( B1, B2, B3 at 0 ) as you would normally
select any object in Blender and duplicate them with SHIFT + D. With
this completed, move the copy to Frame 100, but *** ATTENTION *** the
calculation is rather long and the arrow cursor will flicker
frantically. If you are nervous about the erratic movements during
this time, you may believe that Blender has even locked up... Calmly
continue to use the mouse despite the fact that the arrow cursor
continues to 'flicker' a little more. Left click to confirm the new
position or right click to cancel the operation. Pressing the X key
erases the selected elements. Attention: There is no UNDO possibility
here, so make a backup before performing any perilous operation in
this window. Once these elements are duplicated, play the animation (
ALT+SHIFT+A ) again until Frame 100 to see the result.
That's
not all: It is also amusing to copy some of the elements and place
them on the animation time line and watch the effects produced...
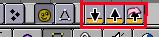 Still
a little more... With regards to these three small odd
buttons which do not appear in the 3D Window header, unless you're in
'Pose' mode. The 'downwards pointing arrow' icon button copies the
current pose of the selected elements into the buffer.
Then you can change the frame to some point in your animation and by
clicking the second button, give the current elements, the pose which
you have just copied, or the exact opposite pose by clicking on the
third button. It is obviously useful, only if we think of inserting a
new key via 'I' immediately after making a copy.
Still
a little more... With regards to these three small odd
buttons which do not appear in the 3D Window header, unless you're in
'Pose' mode. The 'downwards pointing arrow' icon button copies the
current pose of the selected elements into the buffer.
Then you can change the frame to some point in your animation and by
clicking the second button, give the current elements, the pose which
you have just copied, or the exact opposite pose by clicking on the
third button. It is obviously useful, only if we think of inserting a
new key via 'I' immediately after making a copy.
You
can open the tut-ika-01.zip file
which was used in this example.
And
the Ipo curve? In this example, only Ipo's specific to the
new functions were used. However, the traditional editing of Ipo's is
still possible. If you want to add a global movement to an armature,
it remains possible to assign a completely normal Ipo curve to it,
which will influence the entire movement.
Warning: main(../../../stats/stats_1/hit.php) [function.main]: failed to open stream: No such file or directory in /mnt/105/sdb/d/7/mmaigrot/didac-blender/ikas/ikas-eng/ik-p2.php on line 155
Warning: main() [function.include]: Failed opening '../../../stats/stats_1/hit.php' for inclusion (include_path='/mnt/105/sdb/d/7/mmaigrot/include:.:/usr/php4/lib/php') in /mnt/105/sdb/d/7/mmaigrot/didac-blender/ikas/ikas-eng/ik-p2.php on line 155