Ikas Blender 3D ( 6 - Weight paint )
![]() Introduction
- Armature and Mesh - First
animation - A little more
- Constraints - Weight
-Various
tricks
Introduction
- Armature and Mesh - First
animation - A little more
- Constraints - Weight
-Various
tricks
Weight painting: This process makes it possible to modify the ' Weight' value of the entire or part of a group. Before using this feature, it is necessary to know:

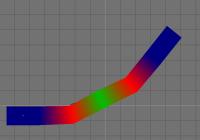 In
the preceding image, you'll notice that the selected group ( B2 ) is
displayed in red. The color corresponds to the value of the 'weight'
which is assigned to the vertices that are in the active group. To
assure yourself of this fact, enter the value 0.5 in the 'weight' box
of the 'edit buttons' window and with the cursor, smear the central
part of B2 to obtain the visible result that appears, as is shown in
the opposite image. Thus, it is the color which makes it possible to
locate with regards to the value of the 'weight' associated to your
vertices. The two extremes are: Blue=0, Red=1, the intermediate
colors are ( in ascending order ) green->yellow->orange.
In
the preceding image, you'll notice that the selected group ( B2 ) is
displayed in red. The color corresponds to the value of the 'weight'
which is assigned to the vertices that are in the active group. To
assure yourself of this fact, enter the value 0.5 in the 'weight' box
of the 'edit buttons' window and with the cursor, smear the central
part of B2 to obtain the visible result that appears, as is shown in
the opposite image. Thus, it is the color which makes it possible to
locate with regards to the value of the 'weight' associated to your
vertices. The two extremes are: Blue=0, Red=1, the intermediate
colors are ( in ascending order ) green->yellow->orange.
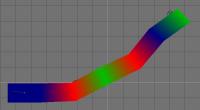 Continue
in the same spirit by smearing the right end of the object and you
will see this. Quit 'Weight Paint' mode by clicking on the button
which represents a 'bone', switch to 'edit' mode ( Tab ) and click on
the button 'Select' in the group's options to see that the vertices
which you swept with the weight paint were included in the group
during the course of selection. ( This will not work if the vertices
do not belong to any groups of the armature ).
Continue
in the same spirit by smearing the right end of the object and you
will see this. Quit 'Weight Paint' mode by clicking on the button
which represents a 'bone', switch to 'edit' mode ( Tab ) and click on
the button 'Select' in the group's options to see that the vertices
which you swept with the weight paint were included in the group
during the course of selection. ( This will not work if the vertices
do not belong to any groups of the armature ).
 You
can also work in face mode as is done for UV-Mapping. Press 'F' and
the buttons should have this appearance:
You
can also work in face mode as is done for UV-Mapping. Press 'F' and
the buttons should have this appearance:
![]()
Note:
It is possible that the weight paint function may become completely
inoperative for a given file, a quick toggle of the normal 'paint'
mode ( The left-most button in the group of 4 ) solves the problem in
a large majority of cases.
In the 'vertex paint' window, it is
the cursor 'size' ( brush diameter adjustment ) which will be of most
use to you. The cursor 'opacity' has an influence on the result, but
is redundant with the value given to ' weight '. My opinion: Set it
to 1 and forget about it. In theory, the two buttons 'Area' and
'Soft' must remain inserted, but you can always have fun to see the
results obtained by modifying their state. However, it is while
playing with 'area', 'soft' and 'normal' that i sometimes get a
'crash' ( With version 2.20 dynamic, OS: linux Mandrake 8.0, closing
Blender following a segmentation error ) which makes the function
inoperative after restarting.
In case you make an error while
weight painting, pressing the 'U' key cancels the last painting
operation performed.
The other buttons and cursor controls do not
appear to be useful with this feature.